It is highly desirable, before beginning the practice of head-to-head balancing, for the bottom man as well as the top man to practice the solo head balance on the floor. He will then feel the exact movement of the upper partner at all times and assist him immediately when the balance shifts. By having both men master the solo head balance, the head-to-head position can be accomplished in less than half the time that would otherwise be required; an under man who knows nothing about the theory of single head balance will, for a considerable time, work directly against his partner’s balance instead of with him!
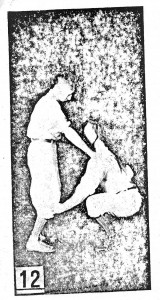
Position No. 12: Starting the mount. Take the position shown; the under man grasps the top shin just under the knees, and the latter places his hands on the under man’s shoulders. He then springs upward, and the under man raises him up to position 13.
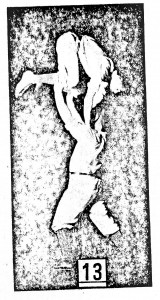
Position No. 13: Each straightens his arms to put the top man in position to place his head in the grommet which is held to the bottom man’s head by a piece of half-inch black elastic (worn under the chin or behind the head and attached to the sides of the grommet to hold it firmly in place). The under man holds his head erect, face perpendicular, to keep the grommet horizontal and level.
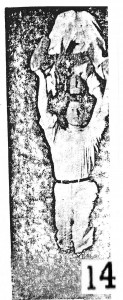
Position No. 14: Once the top man has placed his head firmly on the grommet, he grasps his partner’s wrists, one at a time, then spreads his legs and straightens his back in precisely the correct form for solo balancing. After practicing this mount a few times, the bottom man can begin walking forward and backward, to either side and in a circle, rapidly gaining for the team a good sense of balance
Position No. 15: When the team has developed enough endurance to make the balance feel fairly easy, the top man begins to release his grip by degrees until the free balance feels sure. The under man does not lower his arms, but leaves them raised to be convenient for the top man to grasp in case the balance is lost.
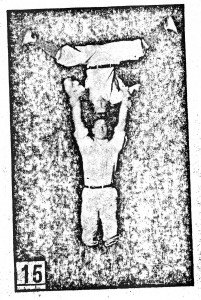
The team is now balancing exactly as in Figure 15 excepting that the top man is using his arms as in Figure 6, grasping his partner’s upraised arms only when in danger of falling. The two men work for the balance exactly alike; if the top mounter is going of balance to his left, he pulls in the left arm and leg, and presses against the left side of the grommet, while his partner below presses harder on the right side of the grommet and shifts himself slightly to his right (which, of course, corresponds to the top man’s left). The same method applies to the other directions in which balance can be lost, and these movements become shorter and shorter as practice brings progress—until they become imperceptible, and the head balance is under complete control as in positions 16-17.
Position No. 16: This position is very easy, after number 15 has been mastered, and you can balance without assistance from the bottom man’s hands. Simply raise the hands to the hips, and there you are.
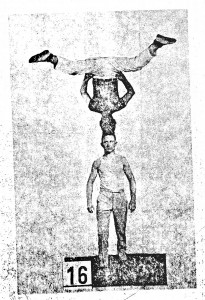
Position No. 17: Practice the preceding balance, gradually raising the legs higher and higher, and using the technique of figure 10 for controlling the position. Finally bring the legs together—at first, in this position, you will have to use the arms a bit as in figure 9 to aid you, but gradually master the head-and-body method of balancing, and work up to the style and position shown here.
You are ready to practice such head-to-head numbers as walking about, up and down steps, juggling, etc., as you may fancy. As you progress you will pick up additional ideas.
If you want more information from Professor Paulinetti and Bob Jones on balancing on your HANDS then I highly recommend you check out their book The True Art and Science of Hand Balancing. It has this much detail plus so much more.
