My current goal in hand balancing is to do the one arm handstand. Its been a goal for a long time.
On that note I’m going to start a new series of articles that detail my progress toward it. This series will be off and on as I try new exercises, have breakthrough’s and make progress. There will be no known end point and no regular schedule to these, but they‘ll come when they come.
Before I get to that though we need to start with the preliminaries.
Where should you be at in your hand balancing practice before you begin in the one arm handstand?

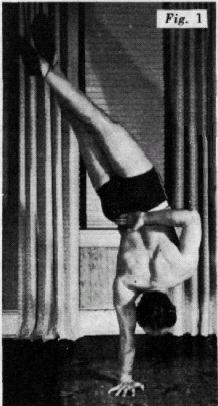
Bob Jones in a One Arm Handstand
Bob Jones from The True Art and Science of Hand Balancing says:
“He who cannot walk can hardly run, and it is equally true that one who cannot do a correct two hands balance can hardly hope to master the balance on one hand. And by this term I do not mean mere ability to stand on the two hands; I mean the ability to stand in good position and to remain there by balancing correctly. So, before making a pass as the one-hander, check back on your two hands position.
“The position on two hands must be with arms straight and perpendicular when viewed from the side. Use all your back bend-whether much or little does not make too much difference, but use all of it until you learn the balance; then you can stiffen up if desired. Go over Chapter 7 and check your position to make certain you balance correctly in the proper position; weight on the ball of the hand, balance by wrist action (imagine that you are balancing on one hand on a silver dollar placed underneath the first two knuckles), and not by wiggling or shimmying the legs from knees, hips, or small of back. If you feel satisfied, let us proceed.”
And from Professor Orlick in How to do the One Hand Handstand:
“YOU MUST FIRST MASTER THE TWO-HAND HANDSTAND. That’s right! You cannot possibly do a good One-Hand Handstand until you can do a perfect Two-Hand Handstand.
“This does not mean that you must be able to perform all of the hundreds of tricks in my basic course “Handbalancing Made Easy”. It simply means that you must be able to press into a perfect Two-Hand Handstand and hold it with absolute control. It means that your elbows must be straight and locked, that your shoulders must be stretched out and locked, that your back must be only slightly arched, your knees perfectly straight and your toes pointed.
“When your shoulders are fully stretched out, you shoulder muscles (deltoids) should actually be pressing against your ears. Furthermore, there should be a straight bone-to-bone alignment at your elbow and shoulder joints so that no strength is needed to support your bodyweight. When you get into this fully locked-out position, with every part of your body stiffened out into a straight line from your hands to the very tip of your toes, then you will be able to hold the Perfect Two-Hand Handstand with practically no effort whatsoever. In fact, all that it will require to keep you up there is the slightest bit of pressure against the floor with your fingertips.
“The fully locked-out position in the two-hand handstand, is the half-way mark to the One-Hand Handstand. This is the position you must assume every time you want to go into the One-Hand Handstand. In fact, this is so close to the One-Hand Handstand that you can’t get much closer to it without actually doing it.
“YOU should practice the perfect Two-Hand Handstand until you have absolute control of it before going on to the One-Hand Handstand. You can figure that you have reached this point when you can hold a fully locked-out two-hand handstand consistently for about 45 seconds. Most good handbalancers can hold it twice this long so you should keep on practicing until at least one minute is well within your capability.”
While there is disagreement about the back-bend the rest of the details are similar. Before beginning the one arm handstand you need to be able to hold a handstand with ease in good position.
If you can’t do this, your efforts towards the one arm handstand are going to result in nothing but frustration.
This is getting me excited to work on my position more right now.
Next time we’ll look at some other important lead-up stunts before beginning in earnest with the one armer itself.
Good Luck and Good Hand Balancing,
Logan Christopher
Comments
It is asiest to do (once you have a normal handstand) to straddle out to spread the weight evenly and to shift hte weight to either side very slightly. From there a little more at a time and then you can start to put your legs together to form that classic shape.
Hope that helps, Tam.
@Tam Hewitt-Baker: That’s the way I’ve been practicing. I’ll have more on that topic later.
Glad to see you working to a good cause Logan 🙂
And while a steady + reliable 1 arm handstand still aludes me, I thought I’d share a recent insight…
Flexibility is sooo important!
On a recent motorbike holiday to the Dutch Acrobatic Festival, frequent stops were made to capture the sights, and normally with an upside down bodie in there too! 🙂
Doing handstands in leathers is not easy (I broke them!!) As you can’t get your shoulders open, so best you can aim for is a planch or scorpion handstand. Nothing wrong with these in themselves but the 1 arm planche requires rediculous strength!
Also my handstand teacher had us progressively opening shoulders, and while we were getting more tired, the handstands were getting easier!
Jesse
@jesse: You are correct Jesse. Flexibility does play a big role in a lot of hand balancing.
Pingback: One Arm Handstand Series Part 2