I’ve already put up many articles on handstands, but this one in particular is written for beginners in mind and those who want to know more about handstands, beside the basic guide on how to do them.
Let’s face it – gymnasts doing handstands are an awesome sight, elegant and balanced. When you watch them, you might be thinking to yourself, “If I trained from the time I was five years old, I could do one of those myself.” But that’s far from true. You can master this skill much, much faster! No matter how old you are.
Maybe you’re a guy who had youthful dreams of impressing the neighborhood girls with a handstands. Maybe you’re a woman who watched with envy as younger, more supple yoga class members did handstands. It’s not too late. The fact is, you could be doing one within two or three months, if you are not too overweight and in normal health.
Short History of Handstands
This form of fitness has been around for more than 2000 years. Chinese acrobats were entertaining audiences with handstands in 500 B.C. In ancient India handstands were one of the basic yoga poses. Ancient Greeks soldiers used it as part of their basic fitness routine to get in shape for the many wars among city-states.

Handstands have been part of gymnastic routines for generations. These gifted athletes do handstands for competitions, including the Olympics, that move far beyond simply standing on their hands. They move their legs into complex postures, even doing splits while standing on their hands.
Health Benefits of Handstands
Aside from fulfilling a youthful dream and impressing your friends, why would you choose to do a handstand? First of all, the ability to do a handstand puts you on the fast track to a strong core, healthy bones, a better endocrine system, a powerful upper body, better circulation and strong sense of balance.
A strong upper body means you can lift easily and without undue stress on arms, shoulders and back. Though a handstand looks anything but practical, it is actually a very effective piece of functional fitness, making everyday activities easier to accomplish. You will be able to tote grocery bags from the car into the house without breaking a sweat. Your posture will improve, especially important if you spend much time in front of a computer or working a desk job.
A strong core gives you a lean look and those elusive six-pack abs, if your fat percentage is low enough. Your clothes fit better. But even more important, when your abdominal muscles are in good shape, your balance will improve. Your back, neck and shoulders will be properly stabilized. A solid center of gravity makes all types of movements easier to accomplish.
Your spine stays straighter, reducing the chance of lower back injury. You will experience fewer aches in your neck, shoulders and head. Your tennis game, pickup football matches, swimming, even bike riding will be easier, with less chance of injury. People with strong cores fall less often, whether on a sidewalk after an ice storm or just going upstairs in their homes.
Handstands are the epitome of resistance training. They do indeed resist gravity. More to the point, they force your body to use resistance to muscular contraction, which is how it builds muscle. It also ensures good bone density, which means you are less likely to suffer from osteoporosis with advancing age.
Handstands help to stimulate your endocrine system. Your pituitary gland gets stimulated, helping your body attain its best body weight. The thyroid gets a boost, helping it produce T3 and T4, chemicals that affect your metabolism. The adrenals cut back on cortisol production, which means less stress to your body.
Standing upside down is one of the less common, but most effective, ways to increase blood circulation. This is critical to get oxygen to all parts of your body, increasing energy and even helping you think better. More oxygen reaches your diaphragm and lungs, making breathing easier.
Better balance helps you avoid falls, but it also can actually help you grow new brain cells. Balance training is considered one of the best ways for the brain to improve its sense of proprioception. This is a fancy term for coordination and awareness of your own body. This in turn helps increase brain matter, leading to better focus, longer attention spans, increased learning ability and better recall.
Benefits from handstand pushups are very similar to handstand benefits.
Headstand or Handstand?
Both headstands and handstands look hard, take training and practice and benefit your body. There are several differences though.
Handstand vs. Headstand
With a headstand, the top of your head touches the ground, though your arms take much of the weight. Whoever is dedicated enough will most certainly master headstands without the hands. This fitness exercise tends to be easier to learn because a larger surface of your body touches the floor.
Handstands are harder to master, but are considered more effective for developing muscle tone and strengthening the core. They have a greater effect on the shoulders, arms, wrists and hands.
What Can Happen?
With a handstand, you are moving your body into an unnatural position. Thousands learn to do it safely. But you need to prepare correctly and go slowly.
Problems that might arise include wrist soreness and injuries to the elbow, fingers or shoulder. Pressure on the face, head and neck can lead to redness that lasts for an hour or more after the handstand. Temporary pain from the pressure that builds up in the head area is common.
This isn’t mentioned to scare you away from trying a handstand. The number of people affected is minuscule compared to the huge numbers who are physically able to try this fitness method and experience numerous benefits from it. It is always a good idea to get a checkup and your doctor’s okay before trying any new fitness regimen.
Body Preparation for a Handstand
So now you know why you might want to try a handstand. Though they are impressive to watch, they also look dangerous. What if you fall over? A face full of rug isn’t fun. Landing hard on your back hurts.
With proper preparation and regular practice, you can safely do a gymnast-worthy handstand. Pre-preparation would mean losing weight if you are 50 or more pounds overweight. If you are out of shape, you need to start a basic strength training regime that gradually builds upper body and core muscles.
Strength training is one of the best ways to get in shape, develop wrist, tendon and core strength, all of which help the body get ready for handstand training. Furthermore, most people have limited flexibility in their hips and shoulders. Time in front of the computer, flopped on the couch and slouching in front of the television cause our bodies to lose flexibility. With regular strength training and added flexibility exercises, your hips, shoulders and back with become supple and comfortable with the demands made by handstand practice.
Mental Preparation for a Handstand
Fear of falling and hurting themselves is the biggest reason people don’t do handstands. Some people have vertigo and simply being upside down induces anxiety. Essential for overcoming fear is gradual steps and consistency. Also, make sure to follow tips written in this article.
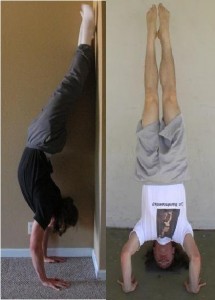
The method used to reduce the fear to manageable levels is to start with a basic plank pose and gradually increase the angle and height of your feet. So, first you need to start out leaning your feet against the wall. Eventually most anyone can do a straight handstand without the security of a nearby wall. Check out this article to learn how to do a handstand against the wall.
Falling over is a sensible fear. By learning how to fall over safely, you eliminate the fear of crashing onto your back or face. The pirouette safe fall, or bail, lets you have a practical sense of control over your movements. Click here to find out how to get out of a handstand. With practice of this movement, you can learn to control your trip to the ground if you overbalance in the handstand position. It involves putting weight on one arm and letting the other one teeter forward.
Steps to a Successful Handstand
Practice at least five minutes a day. Though that doesn’t sound like much, you can make major progress over the course of one or two months in just a few short minutes daily. What doesn’t work is trying to do it for an hour once a week. Training for short periods on a regular schedule throughout the week will give you the best results.
An actual handstand starts with the plank position close to a wall or solid fence. Your hands should be directly under your shoulders. Start with your feet on the floor and gradually move them up the wall. Don’t try to do too much too soon. Even an inch each time you do this exercise will reap solid benefits. Slow progress is key to a successful handstand.
Try to stay in position at least a minute each time you work on your handstand. Slowly inch your hands closer to the wall. Remember to breathe. Pushing your shoulders and arms toward the ground, lock your elbows and move your hands closer together. Each time you do the exercise, move your hands a little closer to the wall.
Day by day your hands get closer to the wall and your feet get higher and higher up the face of the wall. The plank turns into a handstand against the wall, in effect your training wheels through this process. The closest you want to bring your hands to the wall is one foot.
After you can successfully do a handstand against the wall, you can move on to learning how to do an unsupported handstand. Again you start at the wall, but this time you face it head first instead of feet first. Keeping one leg on the ground, you swing the other one over your head. Eventually you will be able to kick up the other leg too.
After doing this many times, you are ready to go wall-free, into a freestanding handstand. Standing up and with hands in the air over your head, you kick out with one foot. After leaning over with arms extended and hands on the ground, you kick out with one foot, then the other. By this time you have the hand, wrist, arm and shoulder strength to hold your body straight up. Just like in the video below.
What to Watch For
- You are using your body in new and different ways. Your muscles and mind will take awhile to absorb the new positions and information that a successful handstand entails.
- There are a few things to watch for that will make your handstand look crisper, flow more smoothly and cause less stress on your body.
- Your legs should be together. Though at a later time you can do a V-shaped handstand, at the beginning it is easier to keep your legs taut and straight. This reduces balance problems and stops flailing.
- Be sure to keep your abs and core contracted. This gives you stability and helps you stay up with less effort. Keep your head directly between your arms. Look up at an angle slightly, which helps your head stay aligned and your back straight.
- Your fingers should be spread out and positioned toward the front. Since they are taking the brunt of the handstand, the finger position is very important. Most of the strain will be on the area extending from your first set of knuckles to the upper part of the palm of your hand. If you need to alter your position during a handstand, put the weight in the direction of your fingers.
- After you master the basic handstand, you can branch out to try the different types. The basic yoga handstand is called Adho Mukha Vrksasana. You could try to achieve a one hand handstand or learn how to walk on your hands.
What to Expect
After you have gone through the training and mastered the handstand, your arms will be strong, lean and muscled. Your balance, coordination and flexibility will top the charts. Your confidence will be brimming over. And you can always give a demonstration at a party, if that’s your thing.
You can find numerous videos on my YouTube channel, as well as articles and books that take you through the steps to a successful handstand. Many people on their own are able to follow along and do one within a month or two. However the fear of falling or doing it wrong and hurting yourself is strong in many of us. It would be great if you could get a spotter to train with, who would help you to avoid falling over or just be there as an extra security measure.
The important thing is to stick with the program. Just five minutes a day can get you on your hands in a matter of weeks. Your upper body will be transformed, muscular, lean and fit. You’ll even find that your self esteem will skyrocket. You’ll feel better mentally, just knowing you are able to perform a handstand. You also get bragging rights. Instead of one of the people who always wondered, you are now one of the few who has actually mastered the fine art of standing upside down.
Click here to find more ways to BUILD UP to a handstand.
If you are interested in more advanced handstand techniques, make sure to check out these: